About Us

Saturday, 26 March 2016

Chocolate and Cardamom Tart

(Serves 12-14)

This is a great Tart to make in advance and it can be left to set and used the next day.  We can't completely take the credit for this one though...it is based on Nigella Lawson's Salted Chocolate Tart.  However, for variation we have made it with Cardamom and it has gone down a storm.


You will need: 1 x 23cm / 10in deep-sided (approx. 5cm / 2in deep), loose-bottomed flan tin.

Ingredients:             

      For the base:

28 Oreo cookies (2 x 154g packets)
50 grams dark chocolate (min. 70% cocoa solids)
50 grams soft unsalted butter
½ teaspoon smoked sea salt flakes

For the filling:

100 grams dark chocolate (min. 70% cocoa solids)
25 grams cornflour
60 ml full fat milk
500 ml double cream
50 grams cocoa (sieved)
2 teaspoons instant espresso powder (or strong instant coffee powder)
75 grams caster sugar
4 Cardamom pods
2 teaspoons extra virgin olive oil

Methods:

For the base:
  1. Snap 50g of the chocolate and the biscuits into pieces and drop them into the bowl of a food processor. Blitz until you have crumbs. 
  2. Add the butter and salt, and blitz again until the mixture starts to clump together. (If you’re doing this by hand, bash the biscuits in a freezer bag until they form crumbs, finely chop the chocolate and melt the butter, then mix everything, along with the salt, in a large bowl with a wooden spoon or your hands encased in disposable vinyl gloves.)
  3. Press mixture into your tart tin and pat down on the bottom and up the sides of the tin with your hands or the back of a spoon, so that the base and sides are evenly lined and smooth. 
  4. Put into the fridge to chill and harden for at least 1 hour, or 2 hours if your fridge is stacked. We wouldn’t keep it for longer than a day like this as the Oreo crust tends to get too crumbly.
For the filling:
  1. Take the Cardamom pods, remove the outer husks and crush the seeds in a pestle and mortar until the  seeds are as powdery as possible.
  2. Finely chop the 100g of chocolate. Put the cornflour into a cup and whisk in the milk until smooth.
  3. Pour the cream into a heavy-based saucepan into which all the ingredients can fit and be stirred without splashing out of the pan, then add the finely chopped chocolate, the cardamom, the sieved cocoa (or just sieve it straight in), espresso or instant coffee powder, sugar and olive oil. Place over a medium to low heat and whisk gently – we use a very small whisk for this, as we are not aiming to get air in the mixture, just trying to banish any lumpiness – as the cream heats and the chocolate starts melting.
  4. Off the heat, whisk in the cornflour and milk mixture until it, too, is smoothly incorporated, and put the pan back on a low heat. With a wooden spoon, keep stirring until the mixture thickens, which it will do around the 10-minute mark, but be prepared for it to take a few minutes more or less. Take the pan off the heat every so often, still stirring, so that everything melds together, without the cream coming to a boil. When ready, it should be thick enough to coat the back of a wooden spoon, and if you run your finger through it (across the back of the spoon) the line should stay.
  5. Pour into a wide measuring jug or batter jug (it should come to about the 600ml/2 ½-cup mark). Now run a piece of baking parchment or greaseproof paper under the cold tap, wring it out and place the damp, crumpled piece right on top of the chocolate mixture, then put the jug into the fridge for 15 minutes. The mixture will still be warm, but will be the right temperature to ooze into the base without melting it.
  6. Pour and scrape the mixture into the biscuit-lined flan tin and put back in the fridge overnight to set. If you wish to eat the tart within 24 hours you can leave it in the fridge. If you would like to make it further in advance then leave the tart to set and then transfer it to the freezer for when you need it. Once thawed it should be used as soon as possible or the base with loose it's crispness.
  7. Remove from fridge 10 minutes before serving, but unmould straight away. (Sit the flan tin on top of a large tin or jar and let the ring part fall away, then transfer the tart to a plate or board, leaving the tin base still on the bottom.)
  8. Slice modestly – this is rich and sweet, and people can always come back for more – and serve with crème fraîche.


Hints, Tips and Alternatives:

  • If you are not a fan of the 'salted' craze, just leave the salt out for a pure chocolatey delight.

  • If you like a bit more of a kick, like we do, then use 5 cardamom pods!

Wednesday, 16 March 2016

Potted Prawns

(Serves 4)


Ingredients:                               Time to Prepare:  15mins
200g unsalted butter
240g raw tiger prawns (fresh or frozen)
¼ teaspoon cayenne pepper
¼ mace
¼ celery Salt
Juice of ½ lime
Pinch table salt


Method:

  1. First melt the butter over a low heat and while the butter is melting chop all but 4 of the tiger prawns into smaller chunks.  (If using frozen prawns, ensure they are defrosted and patted dry with kitchen roll before starting.)
  2. When the butter has melted keep it on the heat until milky white solids start to form.
  3. Pour the clear (clarified) butter into another pan, discarding the whitish solids in the first pan.
  4. Add all ingredients to the pan with the clarified butter (including the 4 whole prawns) and cook on a low heat until the prawns are cooked through.
  5. Spoon the prawns into each of the ramekins popping a whole prawn on the top of each one.
  6. Pour the melted clarified butter left in the pan over the prawns until they are just covered
  7. Pop in the freezer if using later, or in the fridge if using the same day.
  8. Defrost and serve at room temperature with toast and a wedge of lime.  
Hints, Tips and Alternatives:

  • Instead of cayenne pepper use ¼ of a red chilli, finely chopped. 
  • Lemon is more traditionally used, rather than lime, so feel free to swap if desired.
  • Leave out the cayenne pepper completely for a milder taste.

Thursday, 10 March 2016

Mushroom and Thyme Canapés

(Makes:   16 - 18 depending on the canapé bases you use.)

These little mushroom and thyme bites are totally delicious and perfect as a nibble with drinks. The mixture can be made in advance, and frozen if you want to, and then it can be used to fill pastry cases when you need them. In the photograph below we have put the mushroom mixture onto oatmeal canapé shells, put them straight in the freezer and defrosted and decorated when needed.


Ingredients:                                                                            Preparation:  10  minutes
6 large chestnut mushrooms, finely diced                               Cooking Time: 5 minutes
50g butter
2 large cloves of garlic, very finely diced
2 large shallots or small onions, very finely diced 
1 tbsp of double cream
1 tsp of Marsala wine (optional)
a small handful of thyme, stalks and leaves, finely chopped
thyme leaves to decorate
salt and pepper to season
canapé bases - we used Maclean's Highland Bakery oatcake canapé shells 
                                       sourced from http://www.macleansbakery.com/oatcake-range/mini-canape-oatcakes


Method:

  1. Heat a heavy based saucepan over a medium heat. Add the butter and once it is melted and foaming add the finely diced shallots and garlic.
  2. Once the shallots have softened add the diced mushrooms and coat in the buttery mixture to cook.
  3. Cook for 3-4 minutes and then add Marsala and a minute later the cream. The amount of cream may vary slightly depending on how much water the mushrooms release. If they release a lot of water hold back on a little of the cream, it is there to bind the flavours together not to create more liquid. 
  4. Increase the heat to drive off any excess liquid, add the seasoning and the finely chopped thyme to taste.
  5. Remove the mixture from the heat and put one third of the mixture in a small bowl. Whizz the rest of the mixture with a blender (a stick blender is probably best for this small quantity) until you achieve a rough combined texture. You do not want it to be smooth.
  6. Add in the third of the mixture that you didn't blend and mix together. You should now have delicious mushroom mixture which holds together but still has some texture in it.
  7. At this point you can freeze this mixture or you can keep it in the fridge for 24 hours until you need to use it.
  8. Put the mushroom mixture onto the oatmeal canapé shells and serve!
Hints, Tips and Alternatives:
  • Instead of oatmeal canapé shells use the parmesan pastry tartlets we made in an earlier blog.
  • If you can't find canapé shells, then a simple oatcake would work equally well, as do mini vol au vent cases.


Sunday, 6 March 2016

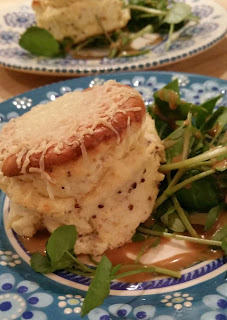
Cheddar and Mustard Souffles

(Serves 8)

Please don't shy away from this simply because it is a souffle.  It is brilliantly easy and freezes so well you have definitely got to try it!

Ingredients:                                                          Preparation Time:  30 mins
140g (5oz) strong cheddar, grated                         
5 eggs                                                                     Oven Temperature: 180C (160C Fan/Gas mark 4)
50g (2oz) unsalted butter
grated Parmesan
50g (2oz) plain flour
2 rounded teaspoons of grainy mustard
300ml (1/2 pint semi-skimmed milk)
Salt
Boiling water

Method:


  1. Grease 8 ramekins with butter and then use a fine grater to grate some Parmesan into each ramekin.  Tip and turn the ramekins to ensure a fine coating of cheese around each one.  
  2. Melt the butter in a saucepan.
  3. Add the flour, mustard and a pinch of salt and stir with a balloon whisk for a minute until combined well.
  4. Pour in the milk, continually whisking, until you get a thick glossy sauce (picture above).
  5. Remove from heat and stir in the grated cheddar, then put to the side.
  6. Separate 4 of the eggs, putting the whites in one bowl and the yolks in another.  (Put the yolks in the larger of the mixing bowls as this is where all the mixture will eventually end up.)
  7. Separate another egg, but ONLY use the white, tipping it into the rest of the egg whites.  (You can always use the left-over extra yolk in scrambled eggs or quiche.)
  8. With the balloon whisk mix the cheesey sauce into the egg yolks, and season to taste.
  9. Whisk the egg whites (use electric beaters for this; so much quicker!) until just forming peaks. 
  10. Take a spoonful of the egg white and beat into the cheesey mixture, then gently fold the rest of the egg whites into the mixture with a large metal spoon.
  11. Spoon the mixture into each ramekin and place inside a roasting tin.
  12. Pull the oven shelf out slightly to be able to put the roasting tin on it, and then pour the boiled water into the tin so it comes about half to two-thirds of the way up the ramekins.
  13. Cook until the souffles are browned and have risen well, then remove the ramekins from the roasting tin.  
  14. Run a knife around the edge of each souffle to loosen it from the ramekin and then tip it out. As they are still hot at this point, I find the easiest way to do this is with a clean tea-towel, using an edge of the towel in one hand to pick up the ramekin and then turning it over into my other hand which has the other half of the tea towel across it, so that it falls into the tea towel. 
  15. Once cooled they can be frozen, or popped into the fridge for two days until needed.
  16. When it is time to cook them, (defrost if necessary) and pop into a buttered oven proof dish.
  17. Grate a little more cheddar over the top to give a crunchy topping, and then bake at 220°C/425°F/gas mark 6 for 10 minutes until well risen.
  18. Serve with a simple watercress salad and a Sherry Dijon dressing (recipe to be posted soon!)


Hints, Tips and Alternatives:
  • Try using different cheeses and mustards, for example goats cheese and English mustard works well.  
  • If using blue cheese, leave out the salt as this cheese tends to be salty anyway.
  • We love these little handled ramekins which make removing them from the hot water so much easier.  We got them from The Perfect Present Company
  • If you are too scared to turn out the souffles at stage 14, just leave them in their ramekins and continue the recipe!

Follow by Email!

You can now get our recipes sent directly to your inbox...just enter your email address in the box to the right of our page and hit submit.  Happy Cooking!


Wednesday, 2 March 2016

Salmon en Croûte

(Serves 4)

This recipe is so easy and is a true show stopper; it tastes divine and can either be made the day before or frozen until you need it.


Time taken to prepare: 20mins (+15mins chilling time)
Oven temp: 200°C/400°F/gas mark 6 


Ingredients:
1 side of salmon (aprox 900g, skinned)
A little olive oil
75 g unsalted butter, softened
Finely grated zest of 1 lemon
Generous handful of basil leavesSmall handful of rocket leaves
Sea salt
Freshly ground black pepper
1 large tbsp wholegrain mustard
500 g puff pastry
plain flour, to dust
1 egg yolk, beaten

Method:
  1. Check the salmon for pin bones, removing any that you find with tweezers, and cut in half. (The end that was nearer the head of the fish can often be much deeper than the tail end. As the the two halves of the fish need to stack on top of each other you may need to trim the deeper half, by taking some of the thinner lower edge off, so the two halves are more evenly matched.)
  2. Line a baking tray with a lightly oiled piece of foil.
  3. Mix the softened butter with the lemon zest, basil, rocket and some salt and pepper in a bowl.
  4. Pat the salmon fillets dry with kitchen paper, then season lightly with salt and pepper. Spread the herb butter mix over one fillet, on the boned side, and the mustard evenly on the other fillet. Sandwich the two salmon fillets together, in opposite directions so both ends are of an even thickness.
  5. Roll out the pastry on a lightly floured surface to a rectangle the thickness of a £1 coin and large enough to enclose the salmon. Put the salmon parcel in the centre of the pastry and brush the surrounding pastry with egg. Bring up the edges, trimming off any excess, and tuck them in before folding the rest of the pastry over to form a neat parcel. Carefully turn the whole thing over so that the seam is underneath and place on the prepared baking tray.
  6. Brush the pastry with beaten egg. Lightly score a herringbone or cross-hatch pattern using the back of a knife. Sprinkle with salt and pepper. Cover loosely and chill for 15 minutes or put in the freezer at this point.
  7. If you have frozen the Salmon en Croûte then remove it from the freezer and leave to thaw slowly before baking.
  8. Bake the salmon for 20 - 25 minutes, until the pastry is golden brown and crisp. To test if ready, insert a skewer into the middle. It should feel warm for medium cooked salmon. A piping hot skewer indicates that the fish is well done.
  9. Rest the salmon for 10 minutes, then cut into portions using a serrated knife. Serve with hollandaise sauce, new potatoes and minted peas.


Hints, Tips and Alternatives:
  • Use tarragon instead of basil and/or English mustard instead of grainy
  • Cut the salmon into 4 equal sized pieces at step 5, and then make individual pastry parcels. (Cooking time may need to be reduced for this.)
  • Recipe for freezable hollandaise will be published later in the blog!!

Thursday, 25 February 2016

Parmesan Pastry Tartlets

(Makes 12 muffin-sized tartlets)


Ingredients:                                                 Time Taken to Prepare:   10 minutes

250g (8oz) plain flour
80g (3oz) grated Parmesan
125g (4 oz) unsalted butter, cut into small cubes
Pinch of salt
3 tablespoons cold water


Method:

  1. Pre-heat the oven to approx 200C,  or 180C fan oven, or gas mark 6.
  2. Pop the flour and salt into a Magimix or similar food processor and blitz for a few seconds to sift.
  3. Add the butter and Parmesan to the food processor and mix until resembling breadcrumbs.
  4. Sprinkle the water over the mixture and then process again until the pastry starts to come together.
  5. Remove and knead slightly to form a smooth ball.
  6. You can either freeze at this stage or put into the fridge for 20 mins or so to chill before cooking. (If freezing now, defrost until a chilled temperature and then re-join recipe at stage 7.)
  7. While chilling grease a 12-hole muffin tin.
  8. Remove from fridge an roll the pastry to approx 2mm thick.  Use a cookie cutter large enough to fill the muffin case to cut out individual rounds, then just gently push into the muffin holes.
  9. Put a bit of grease proof paper into each tartlet and then fill with baking beans.
  10. Cook blind in the oven for approx 7 minutes.
  11. Remove paper and beans and pop back into the oven until golden brown.  
  12. Allow to cool in the tin for a few minutes before transferring to a wire rack to cool completely.
  13. Either use now or freeze for later use, defrosting before filling!

Hints, Tips and Alternatives:
  • Fill with a spoonful of onion marmalade, topped with sliced baby plum tomatoes and your favourite cheese then pop into the oven to melt.  Serve with salad leaves and drizzle with dressing.
  • If you don't like Parmesan, just leave it out of the recipe for a plain pastry case.
  • The same recipe makes one fluted quiche case, measuring approx 26cm in diameter.
  • We will also be doing more quiche recipes, the fillings of which could go in any of these cases.

Tuesday, 23 February 2016

Spiced Chocolate Chip Banana Bread

(Makes one loaf tin aprox 25cm x 12cm x 6cm deep)

This might not make it to a dinner party, but it is truly one of the easiest recipes and ridiculously yummy.  Freezes so well, but smells so good coming out of the oven that I normally make two at a time, one for freezing and one for now!

Ingredients:                                                                         Time Taken:  15 minutes

2 large eggs
3 very ripe bananas
150g (5oz) caster sugar
100g (4 oz) softened butter
225g (8 oz) self-raising flour
100g (4oz) dark chocolate chips
1 level teaspoon baking powder
1 heaped teaspoon mixed spice
1/2 heaped teaspoon cinnamon
2 tablespoons semi-skimmed milk

Method:

  1. Pre-heat oven to 180C (160C Fan or Gas mark 4).
  2. Lightly grease and line the loaf tin with greaseproof paper.  (Alternatively fill a 12-hole muffin tin with cases for individual cakes.)
  3. Pop the ripe bananas into a large mixing bowl and squash with a fork until almost a pureed consistency.
  4. Literally just tip all the other ingredients into the bowl and beat for a couple of minutes until well mixed.
  5. Pour the mixture into the loaf tin and bake for about 1 hour, checking after 50 mins, until risen and dark golden brown.  (If using the muffin cases they will obviously not take as long so check after 20 minutes or so and keep checking until they are firm and springy to the touch.)  A skewer in the center should come out clean...unless it has struck a chocolate chip!
  6. Leave to cool in the tin for a couple of minutes and then remove from the tin and take off the grease-proof paper.  Transfer to a wire rack until ready to eat.   
  7. If you can bear to freeze it let it cool completely and wrap in foil and then clingfilm to keep fresh.
  8. Defrost and then warm through in a coolish oven (approximately 110C) until ready to eat!

Hints, Tips and Alternatives:


  • Once completely cooled, cut into thick slices and freeze each slice individually.  These are great then pulled straight from the freezer and popped into children's lunch boxes, keeping their sandwiches cold but defrosted by lunch-time!
  • Use walnuts instead of chocolate chips, or half and half for a nutty affair.
  • Mixtures of different chocolate chips works too...although we do find the dark the scrummiest!


Friday, 19 February 2016

Dark Chocolate and Hazelnut Mousse

(Makes 6 Small Pots)


Ingredients:                                                                                       Time Taken:  15mins

175g dark chocolate                                                                                                                       
75ml water
3 eggs, separated
10g unsalted butter
2 tablespoons Frangelico

Method

  1. Break the chocolate into a bowl sitting over a pan of simmering water (or bain-marie) and add 75ml water.  Dissolve, stirring occasionally.
  2. Take the liquid chocolate off the heat and mix in the butter.  Allow to cool slightly, while you whisk the egg whites until stiff.
  3. Stir the egg yolks into the chocolate mixture, one by one.Add the Frangelico to the chocolate mixture, stirring until combined.
  4. Take a spoonful of the egg white and beat into the chocolate to loosen the mixture.
  5. Fold the remaining egg whites into the chocolate mixture using a large metal spoon.
  6. Pour into individual pots and cover with clingfilm. 
  7. Freeze (or if eating the following day just pop in the fridge).
  8. Defrost at room temperature for approximately one hour (depending on the size of the pot and the warmth of the room!).  Then chill until needed.
  9. Scatter a few chopped roasted hazelnuts over the top before serving.


Hints, Tips and Alternatives:
  • Don’t worry if the chocolate mixture looks a little grainy.  Once the remaining ingredients have been added and the egg whites folded in it will look scrummy!
  • Try brandy or rum instead of Frangelico, or some cold espresso and top with a chocolate coffee bean.


Welcome to The Effortless Cook blog

We are two mums who are passionate about food and love entertaining. However, with busy work schedules, five children, five dogs and a host of poultry and other pets between us the luxury of spending hours in the kitchen creating divine dinner parties seems long gone.


Our standards are high but we don’t want to be slaves in the kitchen while our guests enjoy cocktails without us, so we started creating more sophisticated food for special occasions which can be prepared well ahead of the event. Over the last three years we have been looking at canapés, starters, main courses and puddings, along with the trimmings, all of which you can cook in advance and freeze until you need them. How much easier would a birthday celebration or a house full of people at Christmas be if you knew that your meals were planned, prepared and waiting in the freezer for you?


Thus we came up with the idea of The Effortless Cook….we hope you enjoy it!